PhotogramsOn this page I shall be looking at the photographers; Lazslo Moholy-Nagy and Man Ray.
How to make a photogram; Make the whole room dark with no light entering anywhere. Place your light sensitive paper down somewhere and start placing objects on top. If you need light to see make sure it is orange or blue. Once you are happy with how you have placed your pictures put some light over the top; a torch, phone light, etc. Expose the image for 5-10 seconds. Depending on how long you expose your picture for determines how dark the image turns out. The shorter the time the lighter it is. Once you have finished place the image in a developer bath, make sure it stays at the bottom of the bath otherwise it wont develop. Once your image has been in the bath for a minute, remove it and hang it in a diamond shape (only holding one corner) so that all the chemicals can fall off. Once all the chemicals are gone place in a stop bath for 30 seconds making sure its at the bottom again. Once 30 seconds has passed remove from the bath and hang diagonally to let the chemicals fall off. Once the paper is try place in the fix bath for 2 minutes making sure it is at the bottom again. Then after 2 minutes hang up again and leave til dry. Once all of this is done you may bring light back into the room. Then take our image to the sink and soak with warm water for 5-10 minutes. Then hang to dry.
|


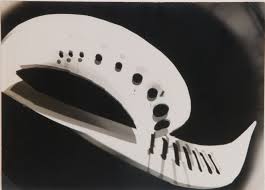
ComparisonThese two images are both photograms but done by two different photographers. These images are both very different as the photogram done by Lazslo Moholy-Nagy is very crisp and simple and there is only one object on the paper. Lazslo has used line and contrast to create this image. In this image Lazslo has created a shape but then I feel that he put a piece of translucent paper over the top of the image to create an effect of shadowing. Whereas Man Ray's piece is very busy and some objects are faded and others are crisp. Man Ray has used contrast to create this image. In this image Man Ray has used many different objects in different ways to confuse the person viewing it. Looking at the image I cant completely tell what he has done to make some of the picture less out of focus than the others.
My Photogram
My photogram I thought didn't go as well as because it is quite a plain piece and I wish I added more objects to it. The object I used was a lace glove which has an interesting pattern but it did not fully come through so we could see it clearly. In this photograph I see an a piece of lace with a cloudy background. The words I would use to describe this image would be detailed yet plain because the detailed object I used isn't covering the whole page and you cant see it fully. If I had to describe this photograph to someone who couldn't see it, I would say that the image is covered by a object halfway across the page diagonally. The right side of the paper is plain with quite a cloudy shape over the top. The left side is quite out of focus but very detailed and structured. This photograph is abstract because it doesn't look like the actual object. I sort of recognise that the object used is lace but I would have thought that something would have been put on top of the background to make it look that way. The process used to create this image is described underneath. This photograph reminds me of a crime scene in the olden days because it looks like a piece of clothing that the murder victim could have been wearing and its been taken in black and white. To describe the tones of this image I would say that it has quite a sinister tone because to me it looks like a murder scene. This picture is different from real life because the whole of the glove is not shown on the photo. The thing that interests me most about this image is the blurriness of the lace because it gives off quite an eerie effect. I think that this photograph is about a murder scene and its the only clue towards finding out who killed the victim. Living in this photograph would be quite scary as it would, by the look of it be very windy and the lace looks as if it would be a maze. I think if I were to redo this image I would add more objects and make sure the lace is in a place where it will stand out. I have learnt from making this photograph that you can mess up quite easily and you have to plan out how you want it before hand.
|
See Some Examples
Lazslo Moholy-Nagy

|

Man Ray

|


|
The Photogram Process
The process we used to make photograms was that we went into the darkroom and made sure we had all of the objects we were going to use for the images. We then turned off the lights and turned on the red lights. We then removed the Kentmere glossy/multigrain paper from the box and put it underneath the enlarger, we did it two at a time. We then placed our objects on top of the paper (I chose a lace glove because it is partly transparent so it would leave a nice pattern.) We then positioned them and turned the light on for 3 seconds and then back off again. We then removed all of the objects that were on the paper and took the image to the developer bath and placed in there until it started developing. After this we placed it into the fix bath for 10-15 seconds and then removed the image and placed it into water for 10 seconds. After this process we hung our image up to dry. Before we turned the light back on we made sure that the bag the paper was in was tied up tight.
2nd Experiment Plan
For my second experiment for my photogram I will use a piece of film, voodoo dolls, a bottle of hand sanitizer, headphones and my iPod. I have chosen these objects because I think they will look very effective. I have chosen a bottle of hand sanitizer because there is something in the bottle and the light should shine on it and make a nice pattern on the paper. I have used voodoo dolls because I think it will make a eerie effect to my photogram. I have used a ruler because light might also go through this and make a weird effect as well. I will finally use my iPod and a piece of film to make a crisp image on my photogram.
2nd Experiment Analysis

For my second experiment for my photogram I think it went very well and was very effective. In my photogram I can see voodoo dolls, a rectangle, a piece of film, a faint outline of a bottle with something inside and some headphones. I would say this image is quite detailed and interesting because with the bottle of hand sanitizer you can see something inside which shows a very weird and detailed shape. It is also interesting because inside the voodoo dolls head, right in the center, it is very white and then the outline is darker. My photogram is naturalistic because you can see what the objects are. I recognize the dolls, the piece of film and the headphones in the image but my iPod just looks like a rectangle and the bottle of hand sanitizer looks very different and confusing. The process used is explained above. The equipment used in this image was light sensitive paper, an enlarger, voodoo dolls, headphones, an iPod, a piece of film, a bottle of hand sanitizer, fixer, developer and water mixed with fairy liquid to wash the image. The lines on the bottle of hand sanitizer are greyish around the outside but the inside of the shape is basically black apart from the hand sanitizer inside which is creating a weird shape and is outlined with a grey colour. The hand sanitizer also creates a weird pattern inside the bottle. This picture is different from real life because it is in black and white and in real life these objects have different colours. What interests me most about this image is that the objects look different to how they do in real life because the bottle of hand sanitizer looks creepy and detailed and the voodoo dolls look like they have brains. The object that strikes me as most interesting is the bottle of hand sanitizer because it looks very strange and gives off quite an eerie effect. I feel that this photograph looks a bit like a crime scene because it looks like there are two dead people. The thing that I find most effective in this photograph is the bottle of hand sanitizer because I feel that it gives off quite an eerie effect to the image. What I feel doesn't work so well is my iPod in the corner because it doesn't look very interesting. What I have learnt from exploring this piece of work is that you don't have to have a camera to take a photograph.
3rd Experiment Analysis

I think that my third photogram was better than all my photograms because it looks a bit busier. In this photograph I can see a plant, a voodoo doll, a piece of film with images on them, a ruler, headphones, a can opener and some scissors. The words I would use for this image would be busy because of the plant in the corner. This image is naturalistic because you can see what the individual objects are. What I recognise about this image is the plant in the corner and the piece of film, the thing that is new to me is the ruler because it hasn't shown up the full colour it is because of the light and it is partly transparent. The process used to make this image is stated at the top of the page. This photograph reminds me of a murder scene that happens in a forest because of the plant that looks like a tree, the voodoo doll and the scissors. This image is different from real life because it is in black and white. The part of the image that strikes me as most interesting is the top left hand corner because it is busy and the lines and shapes are quite interesting. The title I would give this photograph is 'Murder Mystery' because it looks very eerie and like a murder scene as stated above. I think the ruler is used effectively in this photograph because it has captured the play of light very well. I feel like the film doesn't work so well because of the pictures displayed on it.
